
Are you tired of maintaining local credentials for your linux VMs? Do you have accounts set on your linux machines that the password have not been rotated for like forever…
Do you wish maintaining Linux credentials was as easy as Windows Servers?
So for this blog post, I am going to show you how you can leverage Windows Active Directory to set up authentication to your CentOS 7+ or Red Hat 7+ machines.
In this Tutorial, I will be hosting all my VMs on Azure and using Azure Virtual Network to set up my DNS. The steps following those can be used for any Cloud provider, they are OS specific.
Set up Active Directory on Windows Server 2016
- Login to your Windows Server
- Go to Server Manager and Click on Add Roles and Features.
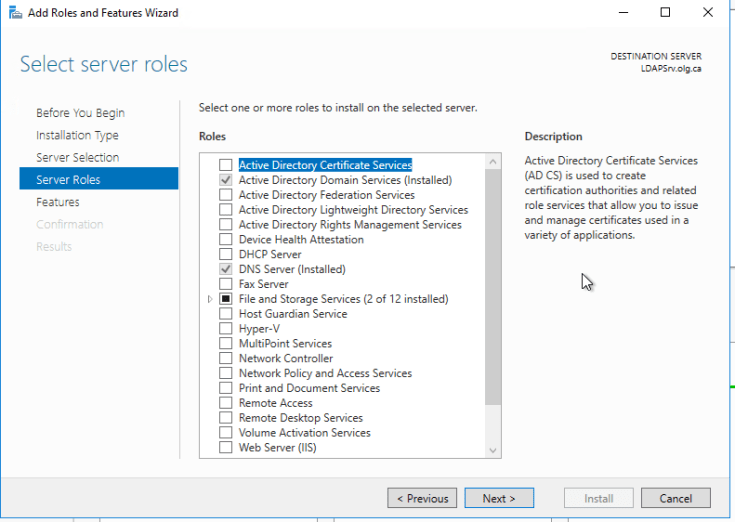
- Click Next with the defaults until you get to the “Select Server Roles” section
- Select the checkpoint beside Active Directory Certificate Services. That is all you need for now.
- Click on Add Features. Then click on Next, Next the Install.
- Give it some time to install, then you can click on the option “Promote this server to a domain controller”. If the window where you clicked on Install has vanished, simple open Server Manage again, click on AD DS on the left side and you should be able to see that option there too.
- Now the Deployment Configuration window will come up. Select Add New Forect and assign a domain name, something like hammad.ca
- Click on Next and then set a password for DSRM and store in a safe place.
- Click Next, confirm that the Domain name is fine with you, then keep clicking Next until the prerequisite check takes place. When it passes successfully, click install.
Note: You will notice a warning that we did not set a static private IP for the machine, if you are on a VM hosted on the Cloud, NEVER make those changes on the VM themselves. You should do that from within your Cloud console where you set the VM’s private IP to static. - The installation will take sometime and then you should be able to login with the credentials you setup the VM with.
- To launch the Active Directory Center, Press the Windows Key + R, type in dsac.exe.
- Feel free to add the users you need. I would also recommend creating a group named sudoers and adding your account to it as a member. We will see why later.
Set the DNS for your Azure Virtual Network
For all your VMs to be able to point to the Domain Controller, you will need to perform the following steps on Azure.
- Login to Azure
- Go to your Virtual Network, where your linux VMs and Domain Controllers are. If there in separate VNets, you can always peer them.

- As you can from the screenshot above, you need to do the DNS Servers section and change it from default to custom and give the private IP of your DC followed by a secondary IP. You can use whatever DNS server you want here, I used Google’s since you can never forget 8.8.8.8 🙂
- That is it for Azure. Now all the VMs within that Virtual Network can now locate your Domain Controller and go through it.
Connect your CentOS or RedHat VMs to connect to the Domain Controller
Important Note: This step is not mentioned in most of the other guides online and it will save you hours of troubleshooting. Make sure your hostname is updated to the fully qualified name. Example, if your linux VM was named mylinux1, make sure you change it to mylinux1.hammad.ca. Hammad.ca being our domain name. The command is as follows: hostnamectl set-hostname mylinux1.hammad.ca
For your info, if you do not set that up, your VM will be able to see the DC but when you run the join the command, you will see the following error
! Couldn't create computer account: CN=mylinux1,CN=Computers,DC=hammad,DC=ca: 00002083: AtrErr: DSID-031519D9, #2:
0: 00002083: DSID-031519D9, problem 1006 (ATT_OR_VALUE_EXISTS), data 0, Att 90303 (servicePrincipalName):len 40
1: 00002083: DSID-031519D9, problem 1006 (ATT_OR_VALUE_EXISTS), data 0, Att 90303 (servicePrincipalName):len 66
adcli: joining domain hammad.ca failed: Couldn't create computer account: CN=mylinuxvm1,CN=Computers,DC=hammad,DC=ca: 00002083: AtrErr: DSID-031519D9, #2:
0: 00002083: DSID-031519D9, problem 1006 (ATT_OR_VALUE_EXISTS), data 0, Att 90303 (servicePrincipalName):len 40
1: 00002083: DSID-031519D9, problem 1006 (ATT_OR_VALUE_EXISTS), data 0, Att 90303 (servicePrincipalName):len 66
! Failed to join the domain
realm: Couldn't join realm: Failed to join the domain
So after changing the hostname to the fully qualified name, follow the rest of the steps,
- Install missing packages
yum install sssd realmd oddjob oddjob-mkhomedir adcli samba-common samba-common-tools krb5-workstation openldap-clients policycoreutils-python -y - Confirm your VM can see the Domain Controller by running
realm discover dc.hammad.ca(dc is the name of your domain controller VM) - Then run the join command
realm join --user=adminuser@HAMMAD.CA dc.HAMMAD.CA --verbose - The user above is an admin user that has the privileges to be able to objects to the domain.
- If the above command run successfully, that is it you are connected to the Domain. You should be able to go to your Domain Controller and see the VM listed under Computers.
- Below are a few additional steps on how to be able to use usernames without their fully qualified names and also elevate to sudo.
Be able to use usernames without the full syntax (example: hammad instead of hammad@hammad.ca)
- vim /etc/sssd/sssd.conf
- Change the value for Use_fully_qualified_names to False.
Elevate to Sudo
- Now during the first section, we created a group named sudoers. We will now add this group to our sudoers list on Linux. So anyone in that group can sudo.
- visudo -f /etc/sudoers
- Press Shift + G to go to the bottom of the file (assuming you are using vi)
- you will see a uncommented line in there for a wheel group (for Centos and red hat). Below add the following line, this line will let the user sudo without being asked for a password:
%sudoers ALL=(ALL) NOPASSWD: ALL
That is it!!!! You should now be able to use your Windows DC to add/remove/disable users on any of your CentOS Redhat machines.
Apologies for the bad formatting, this post was written before the clock strikes 12 for the 1st day of the new year 2019, making this my final post of the year.
Next year, you will see a lot more posts coming along with a summary of all the certifications I would have completed by then.
Wishing you all a very Happy New Year.
*************************************************************************************

Leave a comment